I got you under my thumb.

For givmemo a quick step by step explanation:

Step 1: open image 1 in photo shop. I then made an extraction of my hand shot of the day and put it into another layer.
 It has been resized and moved to the location I need it to be. You will notice the thumb hangs over the building a little.
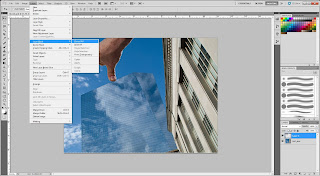
Now you add a layer mask choosing the reveal all option.

Now using the brush tool and painting with black on the layer mask remove any parts of the thumb that don't belong there. I recommend some of the tutorials in the fx section on Worth1000 for help making selections and extractions etc. There are some wonderful things there. :P

Step 1: open image 1 in photo shop. I then made an extraction of my hand shot of the day and put it into another layer.


Now you add a layer mask choosing the reveal all option.

Now using the brush tool and painting with black on the layer mask remove any parts of the thumb that don't belong there. I recommend some of the tutorials in the fx section on Worth1000 for help making selections and extractions etc. There are some wonderful things there. :P
Oh, that's so clever and so endearing, but this is two images, isn't it? The lighting on that thumb dosn't quite seem the same as on the buildings... But it's such a great idea.
ReplyDeleteVery neat picture! It looks like your thumb is pushing down on the building - can I ask how you achieved this effect?
ReplyDeleteHaha. Well done. I would like to see some different lighting techniques used on your hand!
ReplyDeleteVery effectively executed.
ReplyDeleteWell done and quite believable. As Kim says the lighting is not exactly the same, but I still think it looks pretty real. Nice!
ReplyDeleteI did not know there are such high buildings on your island. It would also be cool to do a actual "Tower of Pisa" like perspective illusion but I guess digitally merging is so much fun as well.
ReplyDeleteWhat a fun image! I like the direction you've been taking your photos recently. :)
ReplyDeleteAre you trying to stunt it's growth?
ReplyDeleteMadamMtnLion